Introduction
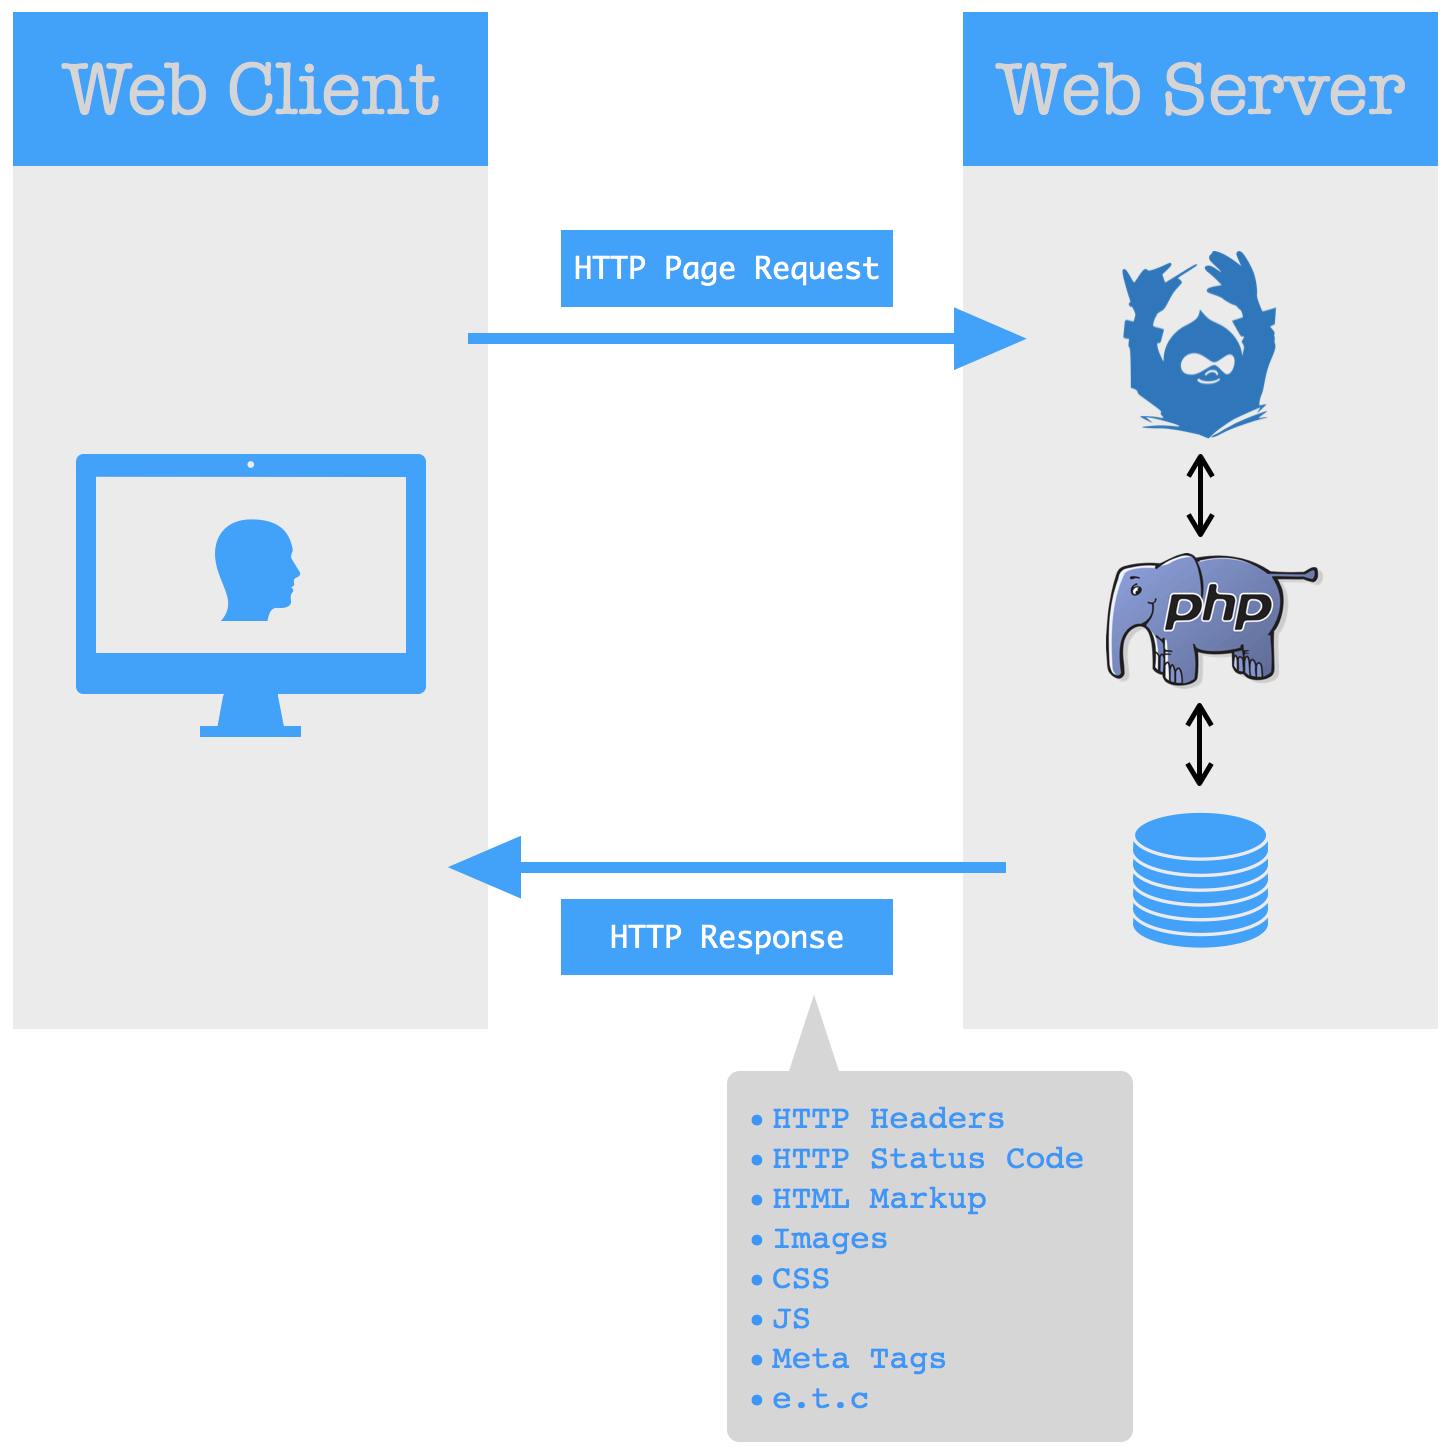
The world wide web, on a large scale, follows the HTTP protocol for client-server communication. This, on a broad level, involves a web client (browser) sending the HTTP request, and the web server (Apache, NGINX, etc) sending the HTTP response back to the web client. And this request-response cycle is a magical thing on its own.
At the web server level, every framework, CMS, or programming language out there has its own way of working with HTTP requests and responses, where every request and response can be authenticated, validated, modified, etc. However, this blog will be talking about the modification process of HTTP responses only.
Default HTTP Response By Drupal
Drupal is one such CMS that offers high flexibility to programmers in the modification of the HTTP response.
Before going into the modification process, Let’s keep in mind that the default Drupal HTTP response usually consists of a package of some of the following elements: HTML markup, CSS, JS, files, HTTP headers, meta tags etc.
Modifying the HTTP Response In Drupal
The periodic evolution of Drupal has resulted in an evolution of the ways of modifying its HTTP responses. Drupal 8 allows programmers to use the #attached property of render arrays to modify default HTTP responses.
The #attached Property
The #attached property of render arrays is used to add attachments to the response generated by Drupal. Attachments could be CSS, JS, feeds, HTTP headers, meta tags, etc.
The #attached property can contain some predefined sub-keys which are processed by the HtmlResponseAttachmentsProcessor class of the Render API in Drupal Core. If any other value apart from the predefined values is used, the processAttachments() function of this class will throw exceptions.
Example Module Showcasing #attached
We have created a custom module called Cuisine to explain attachments in Drupal 8 with working examples. Below is our module structure.
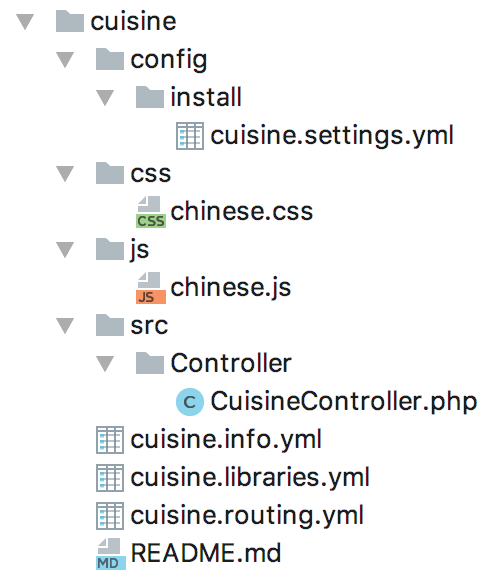
The explanation provided here will be relative to the custom module. This module has been posted on GitHub, where you can access its entire code. Some of the important files in this module are:
- cuisine.routing.yml: This file defines a custom URL called ‘/cuisine’ which will fetch a response from the server showcasing every sub-property of #attached.
- CuisineController.php: This file contains a class that returns the render array consisting of the #attached property.
- cuisine.libraries.yml: This file will define a library called cuisine.chinese, which later on defines a CSS and a JS file.
- chinese.css: Will contain some CSS code.
- chinese.js: Will contain some JS code.
- cuisine.settings.yml: Contains a configuration setting that will be printed on the URL ‘/cuisine’.
The most important file in our module is CuisineController.php which creates a class consisting of the render array that showcases the #attached property as mentioned below:
#attached Details
In the above code, we have used #attached to attach all the components to the page response permitted by Drupal 8. Let’s go through each one:
1. library
Representation:
- library is represented as $render_array[‘#attached’][‘library’]
Description:
- The library property is used to add static assets like CSS and JS to the HTTP response.
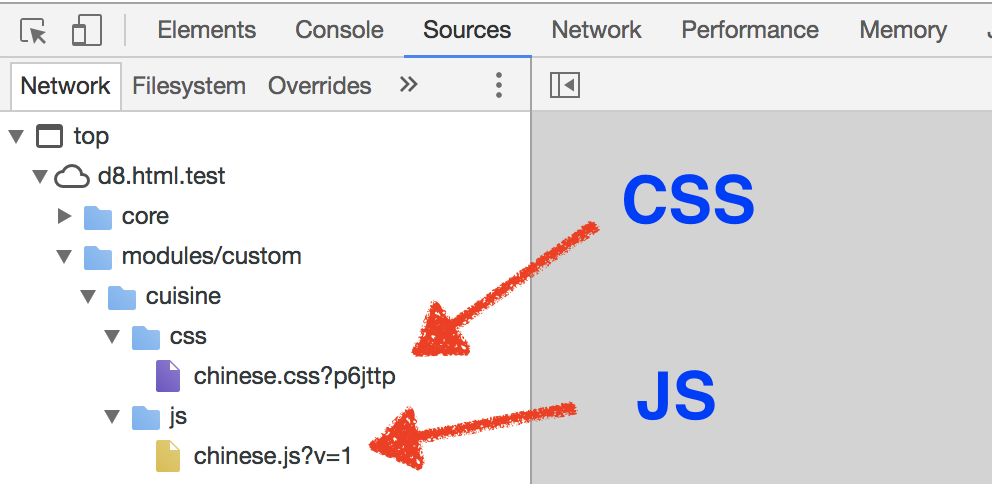
- In the code in our custom module, we have added a library called 'cuisine/cuisine.chinese', which adds chinese.css and chinese.js to the HTTP response.
To verify if your library is attached properly, you can check the sources in your browser DOM. Check the screenshot for reference:
2. drupalSettings
Representation:
- drupalSettings are represented as $render_array[‘#attached’][‘drupalSettings’]
Description:
- In Drupal, drupalSettings are used to pass dynamic values from PHP to JS (cuisine.js in our case).
- Firstly, in our code, we have created a config setting ‘chinese_ingredients’ which holds our dynamic values (check the cuisine.settings.yml file in our module).
- Secondly, in our render array, we have passed the config settings via drupalSettings to the cuisine.js file, which later on changes the markup on the page and prints Chinese sauces as “Soya Sauce, Chilli Sauce, Schezwan Sauce”.
Check the screenshot below for reference:

3. http_header
Representation:
- http_header is represented as $render_array[‘#attached’][‘http_header’]
Description:
- It helps in the creation of HTTP headers and passing them along with the response.
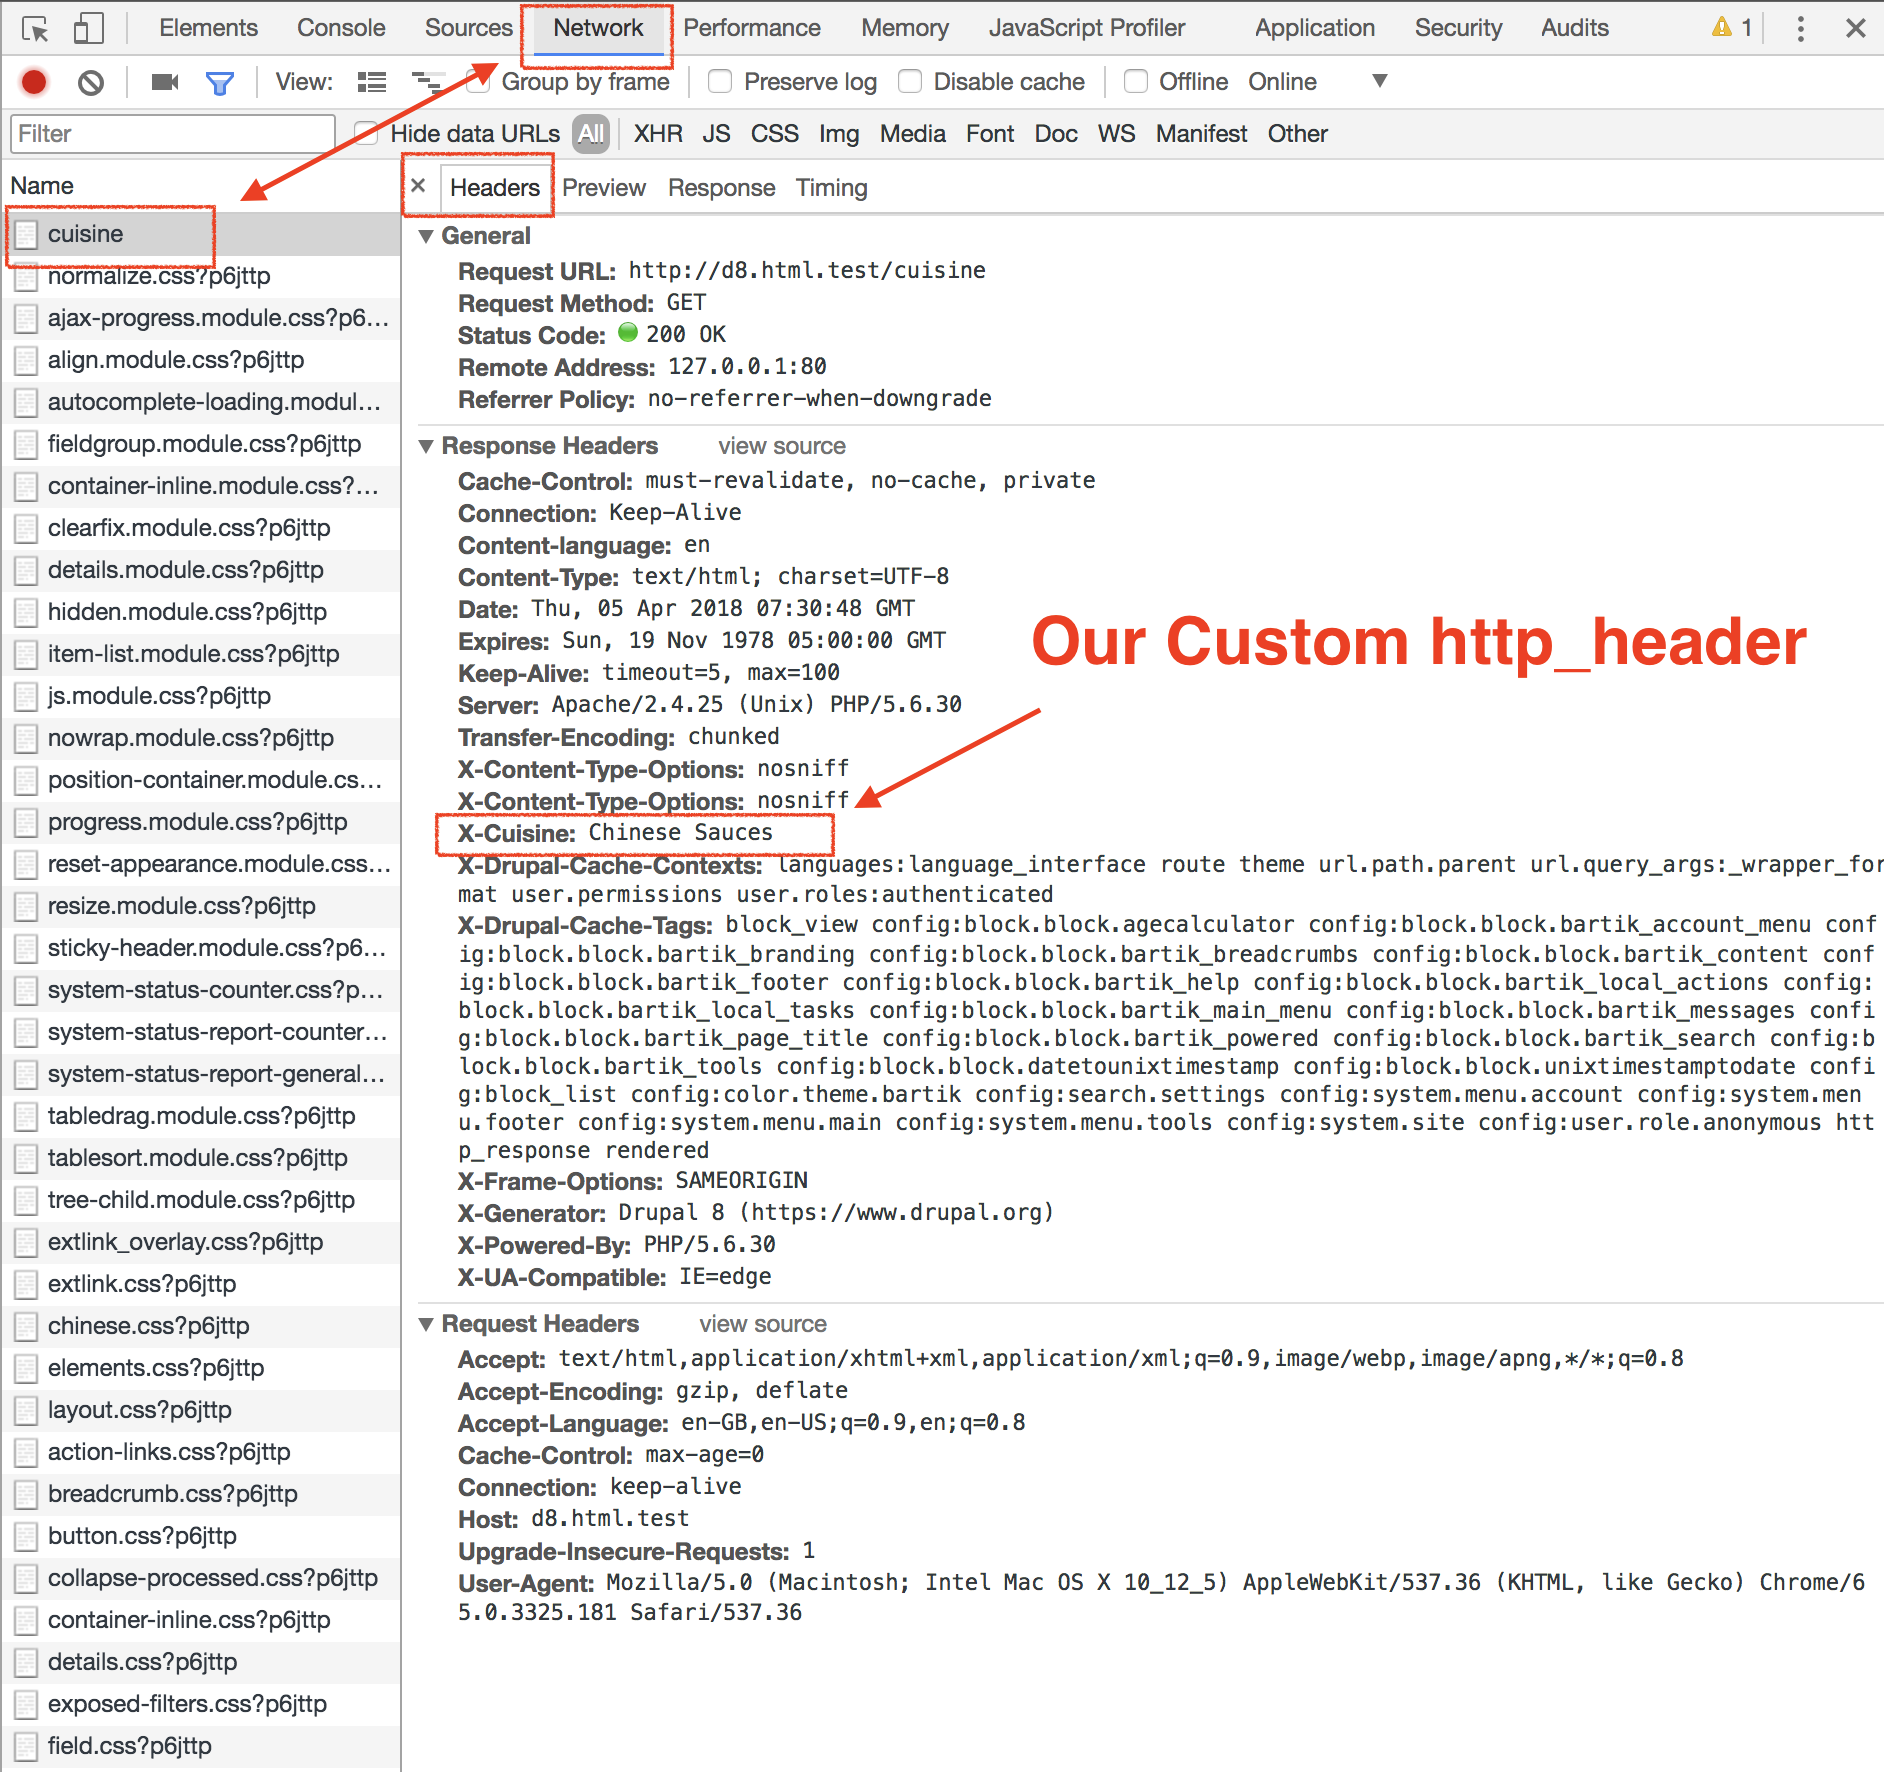
- In our render array we have created a header called ‘X-Cuisine’.
- To verify it’s working, open the browser DOM and go to the ‘network’ tab. Then go to the path ‘/Cuisine’ which we have created.
Once you reach this path, you can see the screenshot below as a reference to verify HTTP headers:
Since Drupal 8’s #attached property offers many sub-properties out-of-the-box, we have divided this post into two parts. This was the first part, in which we have learnt about the library, drupalSettings, and http_header sub-properties. Here's Drupal 8: #attached - Part 2.

Kunal Kursija, PHP/Drupal Staff Engineer
On his downtime, he blows off steam with hyped up ping pong matches. You know, the kinds you lose.


 We respect your privacy. Your information is safe.
