 We respect your privacy. Your information is safe.
Why use Cucumber-Selenium?
Cucumber is an open source tool that supports Behavior Driven Development (BDD) framework. It provides the facility to write tests in a human readable language called Gherkin. The Selenium-Cucumber framework supports programming languages such as Perl, PHP, Python, .NET, Java, etc.
In this blog, we will focus on how to set up Selenium with Cucumber using Maven, and also learn to write feature files using Gherkin, execution, and generating HTML reports.
Prerequisites to set up Cucumber
In order to install Cucumber on your system, you would need some basic installations on your system:
- Set up JDK on your system (JDK 1.8 or the latest version)
- Install Eclipse (Eclipse OXYGEN or the latest version)
- Install Cucumber plugin:
- In Eclipse, go to Help → Install new software
- On the Available Software popup, enter the URL “ http://cucumber.github.com/cucumber-eclipse/update-site ” in the Work with field.
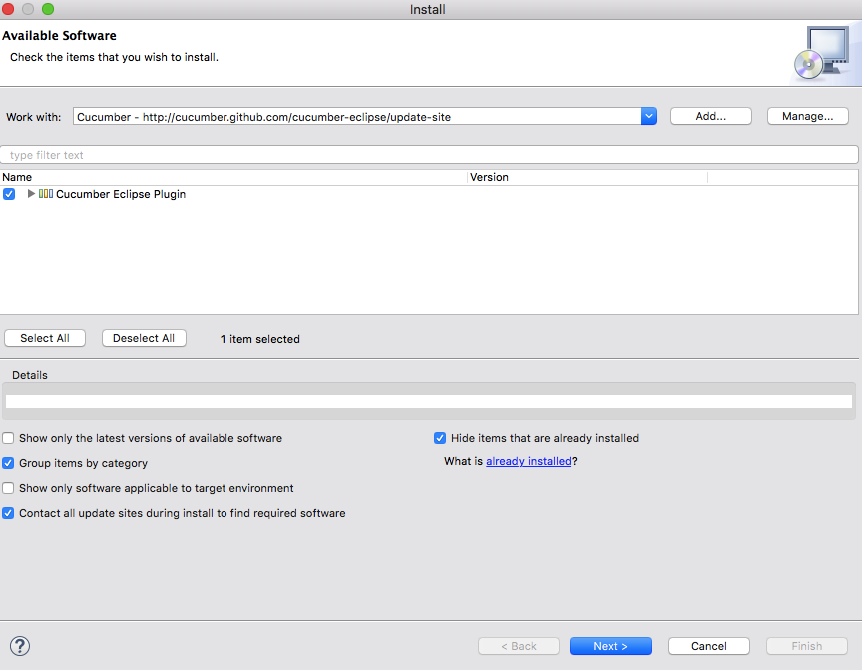
- You will see “Cucumber Eclipse Plugin” displayed in the filter; select the checkbox and click Next, and you will navigate to the Install Details popup. Click Next to proceed further.
- Accept the license in the Review License pop-up and click Finish.
Why Maven?
Maven is a automation build tool and is widely used for Java projects. It is mainly used in managing dependencies through pom.xml. Suppose you want to upgrade the JAR files and in your project you are using version 1.25 for Cucumber-Java dependency. You need to upgrade to the latest version. With the use of Maven, it’s easy to upgrade the version.
Set up your Maven project
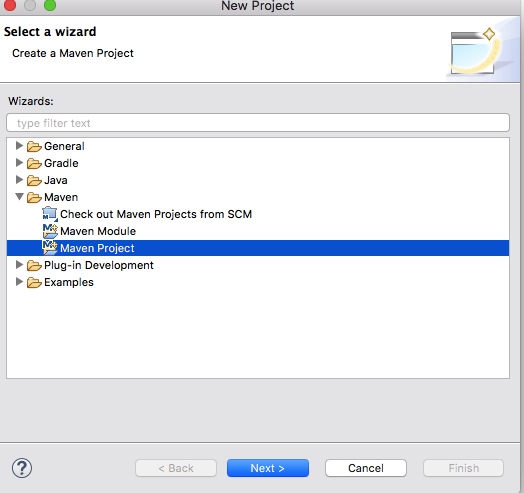
Step 1: To create a Maven Project in Eclipse, click on New → Project → In the wizard, select Maven Project.
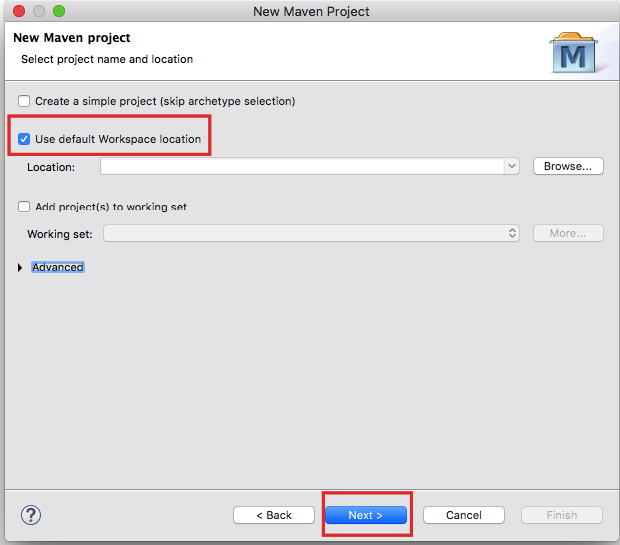
Step 2: On the new Maven Project pop-up, select the checkbox to create your project at the default location OR you can also browse and set a new location of your choice. Click on Next to proceed.
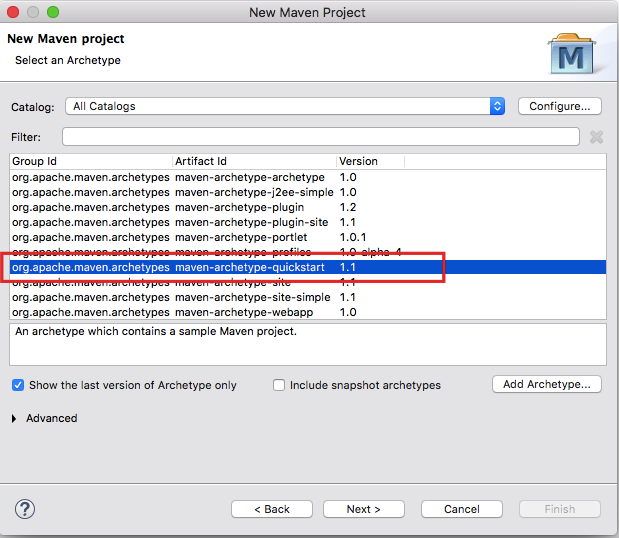
Step 3: On the next screen, by default the Group ID and Artifact ID org.apache.maven.archetypes maven-archetypes-quickstart 1.1 is selected. Click on Next to proceed.
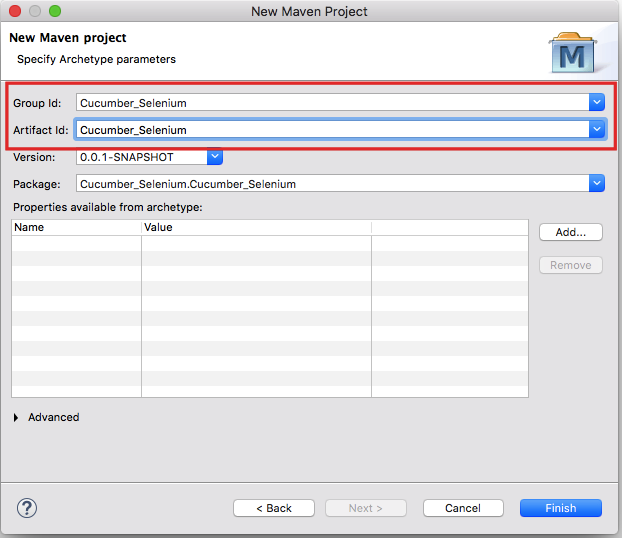
Step 4: In the next screen, you will have to mention a Group ID and Artifact ID of your own choice; this is the name of your Maven project. Once you click the Finish button, a Maven project will be created in Eclipse.
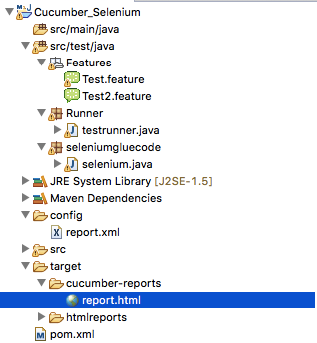
The structure of the project created in Eclipse will be similar to the following image.

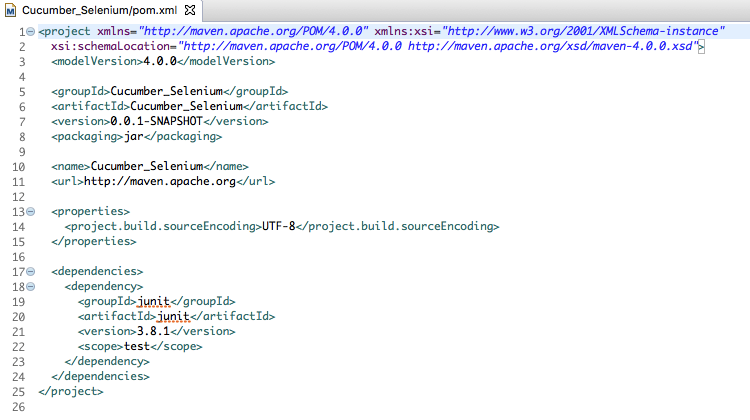
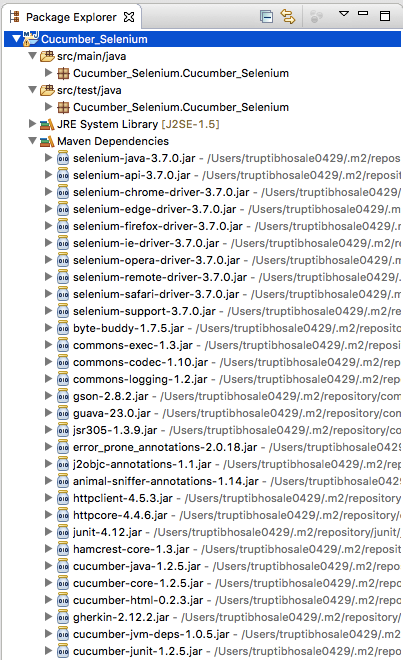
As you can see, there is a pom.xml file created in your Maven project. This file consists of the Group ID and Artifact ID you entered, and by default it consists of dependency for JUnit. Refer to the screenshot below.
Step 5: Now, in order to build a Selenium-Cucumber framework for us to work with, we need to add dependency for Selenium and Cucumber in pom.xml, which is somewhat similar to adding JAR files. We will be needing dependencies of the following:
Selenium-java
Cobertura
Cucumber-jvm-deps
Cucumber-reporting
Gherkin
JUnit
Mockito-all-1.10.19
Cucumber-core
Cucumber-java
Cucumber-junit
Note: Make sure the versions on Cucumber-java, Cucumber -junit and Cucumber-core are the same, i.e., if you are using Cucumber-java-1.2.5 make sure the versions of the other two dependencies are the same.
Step 6: To add dependencies for the above, you should refer to https://mvnrepository.com/. After adding dependencies for Cucumber and Selenium, the pom.xml file will look like this:
<project xmlns="http://maven.apache.org/POM/4.0.0" xmlns:xsi="http://www.w3.org/2001/XMLSchema-instance"
xsi:schemaLocation="http://maven.apache.org/POM/4.0.0 http://maven.apache.org/xsd/maven-4.0.0.xsd">
<modelVersion>4.0.0</modelVersion>
<groupId>Cucumber_Selenium</groupId>
<artifactId>Cucumber_Selenium</artifactId>
<version>0.0.1-SNAPSHOT</version>
<packaging>jar</packaging>
<name>Cucumber_Selenium</name>
<url>http://maven.apache.org</url>
<properties>
<project.build.sourceEncoding>UTF-8</project.build.sourceEncoding>
</properties>
<dependencies>
<dependency>
<groupId>org.seleniumhq.selenium</groupId>
<artifactId>selenium-java</artifactId>
<version>3.7.1</version>
</dependency>
<dependency>
<groupId>junit</groupId>
<artifactId>junit</artifactId>
<version>4.12</version>
<scope>test</scope>
</dependency>
<dependency>
<groupId>org.seleniumhq.selenium</groupId>
<artifactId>selenium-java</artifactId>
<version>3.7.0</version>
</dependency>
<dependency>
<groupId>info.cukes</groupId>
<artifactId>cucumber-java</artifactId>
<version>1.2.5</version>
</dependency>
<dependency>
<groupId>info.cukes</groupId>
<artifactId>cucumber-jvm-deps</artifactId>
<version>1.0.5</version>
<scope>provided</scope>
</dependency>
<dependency>
<groupId>info.cukes</groupId>
<artifactId>cucumber-junit</artifactId>
<version>1.2.5</version>
<scope>test</scope>
</dependency>
<dependency>
<groupId>com.vimalselvam</groupId>
<artifactId>cucumber-extentsreport</artifactId>
<version>3.0.2</version>
</dependency>
<dependency>
<groupId>com.aventstack</groupId>
<artifactId>extentreports</artifactId>
<version>3.1.2</version>
</dependency>
</dependencies>
</project>
Step 7: Make sure to update the project after adding dependencies to pom.xml; you can do that by right clicking Project → Maven → Update Project. Once you update the project, you will see that many JAR files are added to the Maven Dependencies folder in your project.
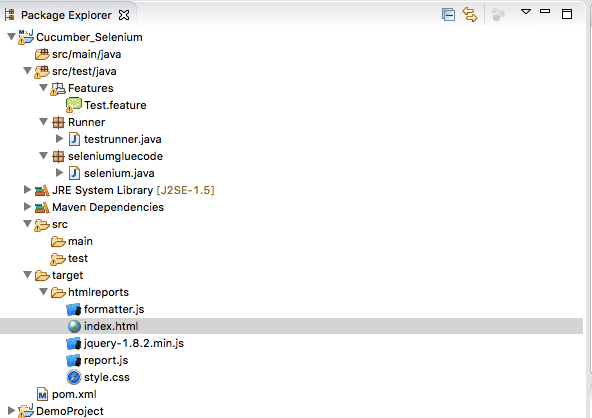
Step 8: To proceed with Cucumber implementation, we need to create three packages to store the feature files, step definition code and testrunner code. Let us create three packages: features, seleniumgluecode and runner. To create a new package in src/test/java, right click the folder → New → Package.
Step 9: Now create the feature file in the Features package. Right click → New → File → Enter name test.feature.
Note: If you don’t find ‘File’, then click on ‘Others’ and then select the ‘File’ option.
Step 10: Create a class test.java to write the gluecode for the features written. Right click seleniumgluecode → New → Class → enter name as test and save.
Step 11: To run the feature files and their respective code, we need to write a JUnit runner class. Right click runner → New → Class → enter name as testrunner.
The basic structure to write and execute code is ready and you are almost set to write and execute Cucumber scripts.
Basic scenarios
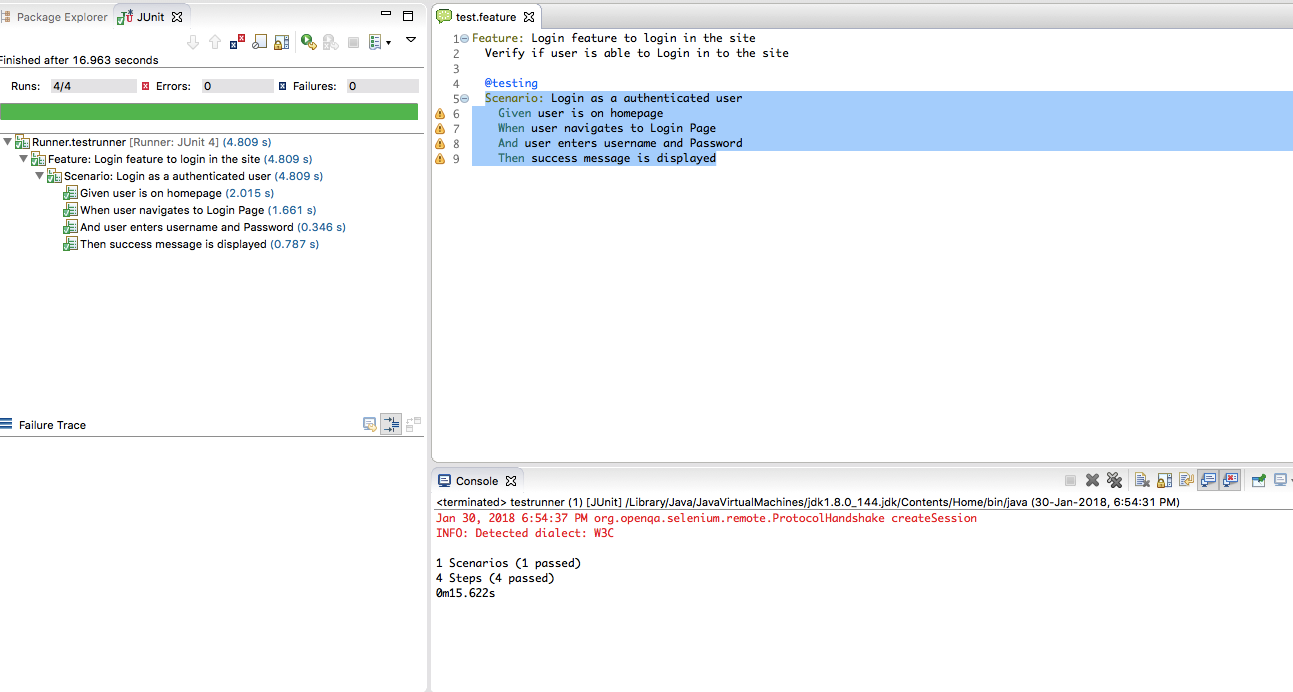
Let us consider a login scenario where the user needs to enter a username and password, and confirm if he can log in. We need to write a basic scenario in the feature file test.feature which we created.
Feature: Login Feature
  Verify if user is able to Login in to the site

  Scenario: Login as a authenticated user
    Given user is  on homepage
    When user navigates to Login Page
    And user enters username and Password
    Then success message is displayed
The basic scenario to test the login functionality is ready. Now, we need to write the JUnit test runner class in order to execute the feature file. Add the code given below to the testrunner.java class.
package Runner;

import org.junit.runner.RunWith;
import cucumber.api.CucumberOptions;
import cucumber.api.junit.Cucumber;

@RunWith(Cucumber.class)
@CucumberOptions(
features = "src/test/javaFeatures"
,glue= {"seleniumgluecode"}
)

public class testrunner {

}
Execution
To execute the code above, right click test.feature file → Run As → Cucumber feature. On executing the test.feature file, you will notice that in the console it mentions the implementation of missing steps. This is because we have not defined the code to execute the steps.
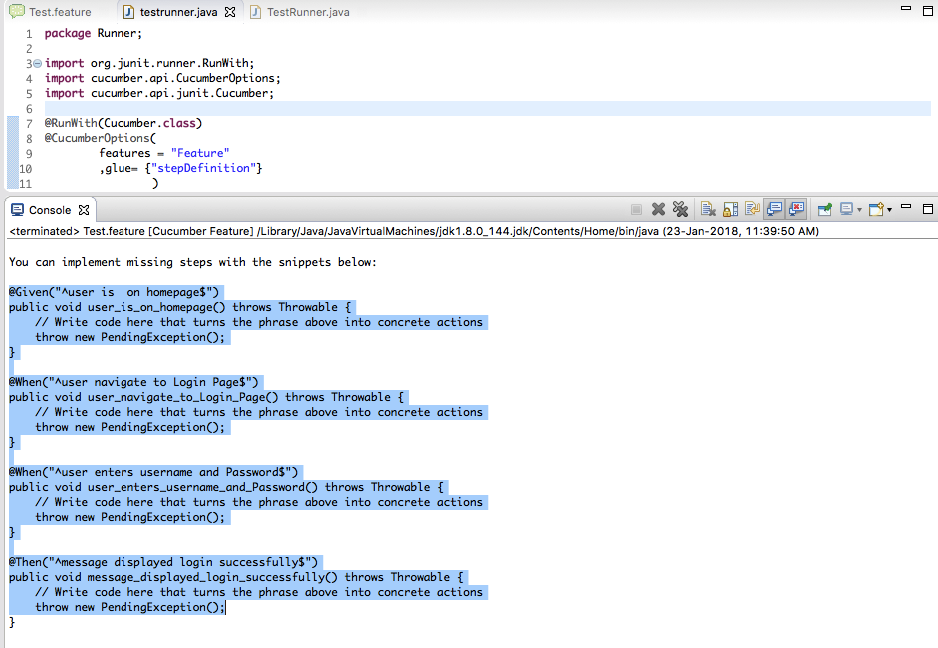
To begin writing the glue code for the steps, copy the snippets from the console and paste them into the test.java class which we created under seleniumgluecode package.
Once you copy the snippet, remove the “throw new PendingException()” and write appropriate code for the steps.
package seleniumgluecode;
import java.util.concurrent.TimeUnit;
import org.openqa.selenium.By;
import org.openqa.selenium.WebDriver;
import org.openqa.selenium.firefox.FirefoxDriver;
import cucumber.api.java.en.Given;
import cucumber.api.java.en.Then;
import cucumber.api.java.en.When;
import org.junit.Assert;

public class test {
    public static WebDriver driver;
    @Given("^user is on homepage$")
    public void user_is_on_homepage() throws Throwable {
    	System.setProperty("webdriver.gecko.driver","/Users/Documents/geckodriver");
        driver = new FirefoxDriver();
        driver.manage().timeouts().implicitlyWait(10, TimeUnit.SECONDS);
        driver.get("http://automationpractice.com/index.php");
    }

    @When("^user navigates to Login Page$")
    public void user_navigates_to_Login_Page() throws Throwable {
        driver.findElement(By.linkText("Sign in")).click();
    }

    @When("^user enters username and Password$")
    public void user_enters_username_and_Password() throws Throwable {
    	driver.findElement(By.id("email")).sendKeys("blog.cucumber@gmail.com");
        driver.findElement(By.id("passwd")).sendKeys("Cucumber@blog");
        driver.findElement(By.id("SubmitLogin")).click();
    }

    @Then("^success message is displayed$")
    public void success_message_is_displayed() throws Throwable {
    	String exp_message = "Welcome to your account. Here you can manage all   of your personal information and orders.";
    	Stringactual = driver.findElement(By.cssSelector(".info-account")).getText();
        Assert.assertEquals(exp_message, actual);
        driver.quit();
    }
}
We are almost ready to execute the feature file, but in order to execute the code on Firefox or Chrome we need to add a very small piece of code in the existing code. Follow the steps in the section below to understand the execution of the code on different browsers.
Execution with different browsers
In Selenium 3, to execute the code on the Firefox or Chrome browsers, we need to use an external driver.
To execute the code on Firefox, we need GeckoDriver.
To use this, download Geckdriver.exe to your system, and in the test.java, before initiating the Firefox browser, set the system property as webdriver.gecko.driver.
System.setProperty("webdriver.gecko.driver","Mentionthepath\geckodriver.exe");
To use Chrome, we need to use ChromeDriver. As with Firefox, here also we need to set the system property as webdriver.chrome.driver.
System.setProperty("webdriver.chrome.driver","MentionPathtothisdriver/chromedriver");
We are all set to execute our first scenario for login functionality on Firefox/Chrome. Add the system property for the desired browser to the function, and then execute the test.feature file, and your browser will open and the login functionality test will be carried out.
Create HTML reports in Cucumber
Imagine that you have to share the test reports with your client and senior management; in that case you will need a shareable HTML report which you can share after executing your tests.
You can achieve this by following some very simple steps.
Create an HTML report by adding a plugin to testrunner.java class
Step 1: In your testrunner.java class, add a plugin inside @CucumberOptions to format your test results into the HTML format.
plugin = { "pretty", "html:target/htmlreports" }
In order to set the path for the reports, we have to give a path in the project. To make this easier, the path is target/htmlreports.
Step 2: Now save the testrunner.java class and execute it. On execution, you will see that the folder htmlreports is created inside the target folder.
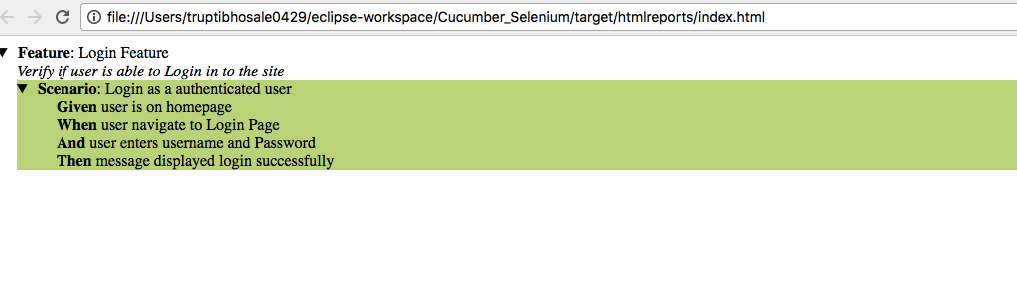
Step 3: Access the folder and look for the index.html file; that is the file which contains the test results in HTML format.
Step 4: Open the index.html to view the report. The report created would be similar to the image below.
Create HTML report by using extent-reports
We have already seen how to create an HTML test report, but with the help of extent reports we can create more well-organized and detailed reports.
Step 1: To implement extent report, we need to add two dependencies to the pom.xml and update the project after adding the dependency.
Cucumber-extentsreport
extentreports
The dependencies for the above would be like this:
<dependency>
    <groupId>com.vimalselvam</groupId>
    <artifactId>cucumber-extentsreport</artifactId>
    <version>3.0.2</version>
   </dependency>

    <dependency>
    <groupId>com.aventstack</groupId>
    <artifactId>extentreports</artifactId>
    <version>3.1.2</version>
   </dependency>
Step 2: Add a new folder to the project. Eg. “config” by right clicking the project folder → New → Folder → Config. Now we have to add an XML file to this folder. This XML file states the theme of the report, title, etc. The report.xml file would be like this:
<?xml version="1.0" encoding="UTF-8"?>
<extentreports>
  <configuration>
    <!-- report theme --> <!-- standard, dark -->
    <theme>standard</theme>

    <!-- document encoding -->  <!-- defaults to UTF-8 -->
    <encoding>UTF-8</encoding>

    <!-- protocol for script and stylesheets -->   <!-- defaults to https -->
    <protocol>https</protocol>

    <!-- title of the document -->
    <documentTitle>Selenium Cucumber Framework</documentTitle>

    <!-- report name - displayed at top-nav -->
    <reportName>Functional Testing report</reportName>

    <!-- global date format override -->  <!-- defaults to yyyy-MM-dd -->
    <dateFormat>yyyy-MM-dd</dateFormat>

    <!-- global time format override -->   <!-- defaults to HH:mm:ss -->
    <timeFormat>HH:mm:ss</timeFormat>

    <!-- custom javascript -->
    <scripts>
      <![CDATA[
        $(document).ready(function() {

        });
      ]]>
    </scripts>

    <!-- custom styles -->
    <styles>
      <![CDATA[

      ]]>
    </styles>
  </configuration>
</extentreports>
Step 3: Now we are almost ready with the setup required for the report, but in order to fetch the report for every test, we need to add a plugin in testrunner.java and add an @AfterClass. In the plugin, we will mention the Extent formatter and the location where we want the report to be saved, and in the after class, we will write a function to load the report.xml. The final testrunner.java class would be like this:
package Runner;

import java.io.File;

import org.junit.AfterClass;
import org.junit.runner.RunWith;

import com.cucumber.listener.ExtentCucumberFormatter;
import com.cucumber.listener.Reporter;

import cucumber.api.CucumberOptions;
import cucumber.api.junit.Cucumber;

@RunWith(Cucumber.class)
@CucumberOptions(
        features ="src/test/java/features"
        ,glue= "seleniumgluecode",
        plugin = { "com.cucumber.listener.ExtentCucumberFormatter:target/cucumber-reports/report.html"},
        monochrome = true
                )

public class testrunner {
    @AfterClass
    public static void writeExtentReport() {
        Reporter.loadXMLConfig(new File("config/report.xml"));

    }
}
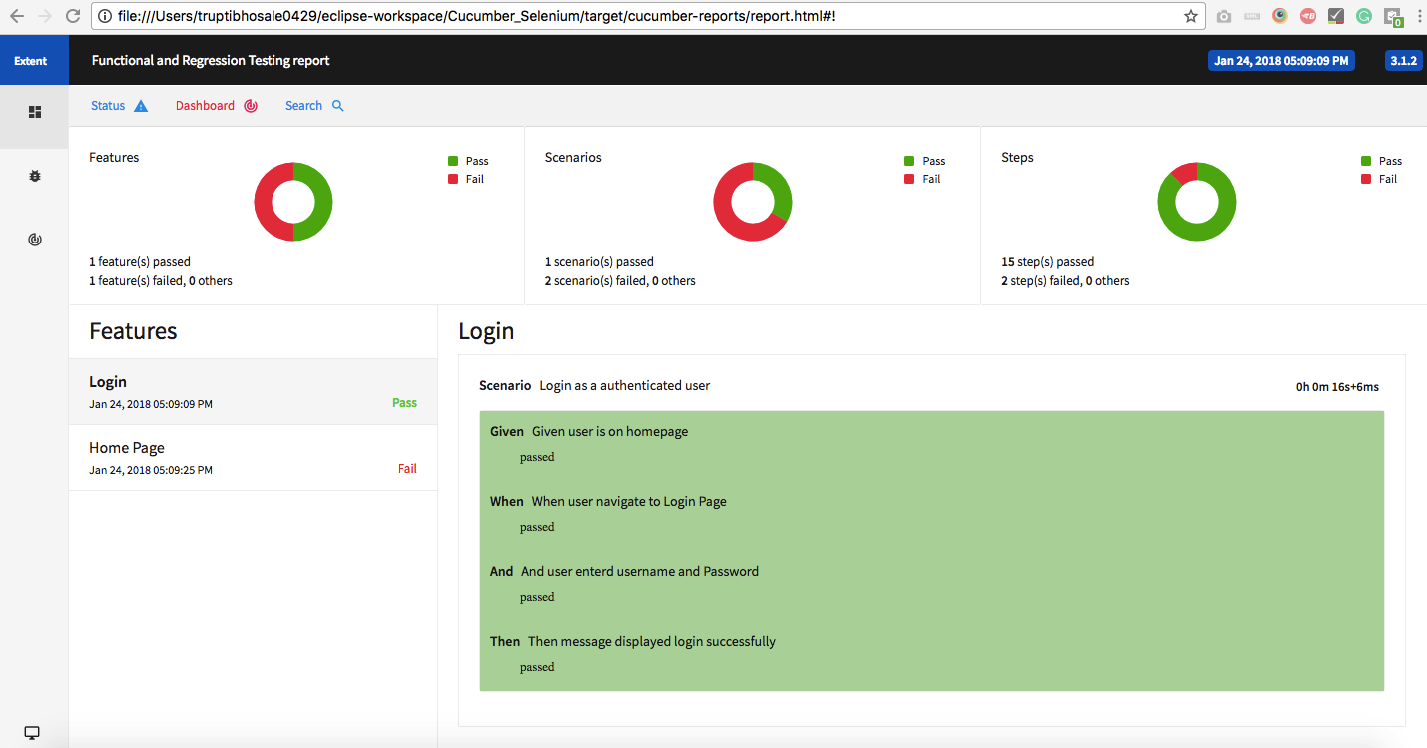
Step 4: On executing the tests, a new folder will be created at the path mentioned in the plugin. Open the folder and open the report.html.
The report created will have a heading, graph of the test results, detailed results for all features executed, and you can also filter the test results with the status Pass/Fail by clicking the Status menu.
Command line execution
Executing your Cucumber tests from Eclipse is very easy, but you can also execute them through the command line. The steps to execute the tests through the command line are as follows:
- Open the terminal in your system and navigate to your project directory.
- Since we have already added a Maven dependency through pom.xml, we can execute the test using the simple command mvn test.
- In case you have a large number of feature files added to your project, and you only want to execute a smoketest.feature file, you can use the command mvn test -Dcucumber.options=”src/test/java/Features/smoketest.feature.

Nikita Jain, Quality Assurance Staff Engineer
"Nikki" is a shopaholic with wanderlust, who loves Bollywood movies and good food; offline, you'll find her doting on her beautiful baby girl.