
 We respect your privacy. Your information is safe.
Introduction
With any software application, regression testing is a large part of the release cycle. Often, a team of quality analysts are on standby to perform regressions upon a new software release, sometimes just to ensure the important user flows work correctly.
There are many ways to perform this exercise, ranging from manual QA cycles to running a test suite of Behat tests, Selenium tests, etc. The problem is that often visual or CSS bugs are not caught during these exercises. Even with manual QA, it can be a highly subjective process—if something is a mere 10-20 px off its correct position on a web page, whether it’s identified depends entirely on how keenly the tester is scanning the page.
Visual bugs may sometimes lead to embarrassing situations if they are discovered after a public release.
Visual regression testing tools help simplify this process by letting us automate these tests. In regression testing, our goal is to ensure that previously developed software works the same way after it was changed or updated; similarly, via visual regression we aim to ensure that the software looks exactly like it was before it was changed or updated.
To help us do this, we’ll see how we can use Wraith, a responsive screenshot comparison tool.
Installation
Wraith setup is easy enough as it is a Ruby gem, but it needs certain dependencies to work correctly. You will need the following:
- Install casperjs or phantomjs.
- Install ruby if you don’t have it.
- Install imagemagick.
Once you have all of the above, you should be able to run gem install wraith and get a clean install done.
A quick check to see if all went well:
$> wraith --version
Based on your OS, you might need to follow some additional steps.
Here is a gist for setting up Wraith on Linux.
https://gist.github.com/swarad07/1325dc427d82e4dcbee4699c60cb9501
Configuration
Wraith requires very minimal configuration. Create a directory on your system, and run the following command inside it. This should generate some directories and files for you.
We will now make some configurations based on the dependencies we installed. Assuming you installed PhantomJS like me, we will edit the javascript/wait--phantom.js file. There are wait--chrome or wait--casper files as well.
We will change the number 2000 to 10000, so the result should look like this:
We changed the timeout here from 2s to 10s—this will ensure greater reliability when we capture screenshots. Feel free to change this if you think 10s is too high. (YMMV.)
The next step is to edit the file configs/capture.yml. If you don’t want to mess with the default config, you can create your own capture_custom.yml file here. For now, let’s edit the capture.yml directly,
The first thing to change here is the browser we are going to use. We will set this to PhantomJS.
# (required) The engine to run Wraith with. Examples: 'phantomjs', 'casperjs', 'slimerjs'
browser: "phantomjs"
Find the domains: label and add the domains which you want to compare.
# (required) The domains to take screenshots of.
domains:
dev: "https://dev.example.com"
pprod: "https://pprod.example.com"
We just told Wraith which are the two domains it needs to crawl. We will go one step further and also configure the pages we want to diff.
Find the paths: label and add the URLs which you want to compare.
# (required) The paths to capture. All paths should exist for both of the domains specified above.
paths:
AP-example-1: /advanced-page-example-1
AP-example-2: /advanced-page-example-2
AP-example-3: /advanced-page-example-3
AP-example-4: /advanced-page-example-4
AP-example-5: /advanced-page-example-5
NOTE: You should use the before_capture to add scripts which perform additional tasks before Wraith begins its tests—for example: perform a login, set a cookie, etc.
Create a directory to capture screenshots, and add it to the directory: label.
# (required) The directory that your screenshots will be stored in
directory: 'shots'
You can leave the rest of the options as is. Feel free to adjust the fuzz and threshold to set your tolerances; also you can adjust the breakpoints for responsive layouts.
To run Wraith, use the following command:
$> wraith capture capture
If you created a custom capture.yaml, use the second argument to tell Wraith that it needs to use a custom configuration for capture.
$> wraith capture capture_custom
This will capture screenshots for the domain + URL you configured. Inside the shots directory, there should be a directory for each URL with different screenshots for each resolution.
There will also be a gallery.html to view all the results of the test in a neat slideshow.
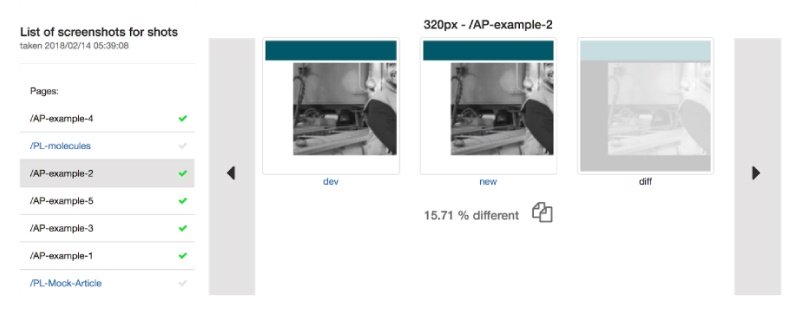
Here, 15.71% is the total diff Wraith found. You can open the diff screenshot to view the difference in detail.
Wraith with CircleCI and Pantheon
The real power of a tool like Wraith is when you integrate it with a CI framework. We use CircleCI for many of our projects, and recently we set up Wraith for one of them.
We were already using Pattern Lab so we could have a design style guide for each of the type of pages on our website. Now, we needed a way to run Wraith against the new merge request/pull request for the new branch against one of our environments which will be our reference.
To do this, we went through the same Wraith setup and configuration mentioned above inside a Docker container. This Docker container is used by our CircleCI build which runs on every merge request/pull request.
Here is the fun part—since we use Pantheon’s multidev setup, for every new branch, a new dedicated environment is created at Pantheon. Using Pantheon’s CLI tool terminus, we can get the URL of the newly spawned environment. But if you don’t use Pantheon, you will need your CI server to set up a site for you using the new code pushed in the branch.
That is one problem solved. The second problem is how to view output for the visual regression test. For this, we can use the artifacts option for a CircleCI job.
After our Wraith capture command is run, we tell CircleCI to move the shots directory as an artifact so it can be accessed via a URL.
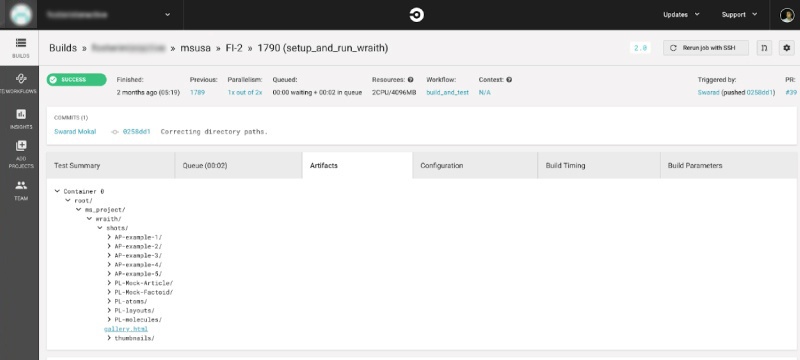
If you click on the gallery.html, the capture gallery will be available for every merge request.
Happy testing!

Swarad Mokal, Technical Program Manager
Big time Manchester United fan, avid gamer, web series binge watcher, and handy auto mechanic.


Leave us a comment