
 We respect your privacy. Your information is safe.
Introduction
Before starting, I'd like to list some pre-requisites below which we want to be familiar with:
- Behat and Mink implementation
- OOP concepts like Encapsulation, Inheritance, Objects and Constructors
The Page Object Model is one of the widely used frameworks in the automation world these days where the UI implementation is hidden from the tests and only clean functions or services are exposed. The term ‘Page Object’ is being used since the model considers each page on the site as a single entity/object. All the elements/details of a page are encapsulated in a single object which can be referenced/called further in your context file(s). This framework is supported across many automation functional/regression tools:
- Selenium Webdriver
- Protractor (Used for AngularJS applications)
- Behat
Let us see how one can implement a model in Behat using the Page Object Extension. The scenario here is for the Contact form on Axelerant website:
|
 |
Doesn’t that sound easy? That’s the power of BDD (Behavioral Driven Development) and the Page Object framework inherently favors and supports it. Let’s continue with our main task.
1. Update the composer by running the following command:
composer require --dev sensiolabs/behat-page-object-extension:"2.0.0-rc2"
2. Activate the changes in your behat.yml file. Add the line below under extensions:
SensioLabs\Behat\PageObjectExtension: ~
3. Continue with the Behat setup as you normally do in case if you haven’t. Click here for more details on setting up Behat.
This is how your composer and yml files should look:
{

"require" : {

  "behat/behat" : "3.0.*",

  "behat/mink-goutte-driver" : "*",

  "behat/mink-browserkit-driver" : "*",

  "behat/mink-extension" : "2.*",

  "behat/mink-selenium2-driver" : "*",

  "behat/mink" : "*"

},


"require-dev" : {

  "sensiolabs/behat-page-object-extension" : "2.0.0-rc2"

},


"config": {

  "bin-dir": "bin/"

}

}
Behat.yml is as below:
#behat.yml

default:

autoload:

  '': %paths.base%/features/bootstrap

suites:

  default:

    contexts:

      - FeatureContext

    paths:

      - %paths.base%/features

extensions:

  Behat\MinkExtension:

      browser_name: 'chrome'

      goutte: ~

      javascript_session: selenium2

      selenium2:

        wd_host: http://127.0.0.1:4444/wd/hub

        capabilities: { "browser": "chrome", "version": "", 'chrome': {'switches':['--start-maximized']}}

      base_url: https://axelerant.com/

  SensioLabs\Behat\PageObjectExtension: ~
In BDD, you start with the scenarios. Let’s write our scenario in Behat using Gherkin. Make sure all the custom step definitions below are added to your FeatureContext file. We will handle them later.
Feature: To test Contact form using Page Object extension


@javascript

Scenario: To test Contact form

  Given I visited homepage

  And I go to contactPage

  When I fill contact info and submit the form

  Then I should be able to see the message
Let’s switch to the Class files now. How do we decide on the number of classes? Well, initially you can just create one class file per page. In our example, we would have three pages:
- Homepage
- Contact Page
- Contact Confirmation Page
Follow the steps below to continue with your class file creation:
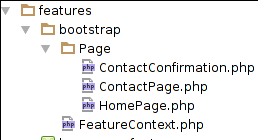
- Create a directory named ‘Page’ under bootstrap. This ‘Page’ directory is responsible for holding all the three pages that you will be creating.
- Create the first class file which is ‘Homepage.php’
- Similarly, create two more class files ‘Contact.php’ and ‘ContactConfirmation.php’
Your directory structure should look something like this:
We are done with the basic task of identifying Page Objects here. The next question that immediately arises - What does each Class file contain?
namespace Page;

use SensioLabs\Behat\PageObjectExtension\PageObject\Page;

class HomePage extends Page{
protected $path = '/';

}
Below is the structure of each Class file:
- Package the entire page by specifying the line - namespace Page; (Line 3)
- Import the library - use SensioLabs\Behat\PageObjectExtension\PageObject\Page; (Line 5)
- Specify a ClassName which is same as the FileName and extending Page -
Class HomePage extends Page { } (Line 7) - A url for the page (optional) - protected path = ‘/’ (in case of homepage) (Line 8)
Here is a snippet on how our Homepage.php file should look like:- - Custom methods related to a particular page. For example, ContactPage would have a function to fill in the form as shown below.
- Similarly, modify the other two class files. Here is another snippet how they should look like:
namespace Page;


use SensioLabs\Behat\PageObjectExtension\PageObject\Page;


class ContactPage extends Page {

  protected $path = '/contact/';


  public function iFillInTheContactFormDetails()

  {

      $this->findField('firstname')->setValue('Michael');

      $this->findField('lastname')->setValue('Cannon');

      $this->findField('email')->setValue('michael@axelerant.com');

      $this->selectFieldOption('hs_persona','persona_7');

      $this->findField('message')->setValue('Testing message - I need to build a site in drupal 8');

  }

}
namespace Page;


use SensioLabs\Behat\PageObjectExtension\PageObject\Page;


class ContactConfirmation extends Page

{

  /**

   * @Then /^I should be able to see the message$/

   */

  public function iShouldBeAbleToSeeTheMessage()

  {

      $this->hasContent("Thank You for Contacting Axelerant");

  }

}
Once your class files are ready, time to switch to the Context file, the FeatureContext.php file in this case which is already present under your bootstrap directory.
use Behat\Behat\Context\Context;
use Page\HomePage;
use Page\ContactPage;
use Page\ContactConfirmation;
use SensioLabs\Behat\PageObjectExtension\PageObject\Page;

class FeatureContext extends Page implements Context, \Behat\Behat\Context\SnippetAcceptingContext
{
private $homepage;
private $contactPage;
private $contactConfirmation;

public function __construct(HomePage $homepage, ContactPage $contactPage, ContactConfirmation $contactConfirmation)
{
$this->homepage = $homepage;
$this->contactPage = $contactPage;
$this->contactConfirmation = $contactConfirmation;
}
}
The following changes need to be made in the Context file:
1. Import all the pages as below: (Lines 3 through 7)
use Page\HomePage;
use Page\ContactPage;
use Page\ContactConfirmation;
use SensioLabs\Behat\PageObjectExtension\PageObject\Page;
2. The Context file should extend the PageObject (Line 9)
Class FeatureContext extends Page
3. Initialize the Page Objects inside the constructor. The FeatureContext file should look something like this: (Lines 11 through 20)
Let’s concentrate on the custom functions in the Context file. Here is how your custom functions defined inside the FeatureContext file are going to look like:
/**
* @Given /^(?:|I )visited (?:|the )(?P<pageName>.*?)$/
*/
public function iVisitedThe($pageName)
{
if (!isset($this->$pageName)) {
throw new \RuntimeException(sprintf('Unrecognised page: "%s".', $pageName));
}
$this->$pageName->open();
}

/**
* @Given /^I go to contactPage$/
*/
public function iGoToContactPage()
{
$this->homepage->findLink("Contact")->click();
}

/**
* @When /^I fill contact info and submit the form$/
*/
public function iFillContactInfoAndSubmitTheForm()
{
$this->contactPage->iFillInTheContactFormDetails();
$this->contactPage->findButton("Contact Axelerant")->click();
}

/**
* @Then /^I should be able to see the message$/
*/
public function iShouldBeAbleToSeeTheMessage()
{
$this->contactConfirmation->iShouldBeAbleToSeeTheMessage();
}
It contains 4 custom methods as below:
- public function iVisitedThe($pageName) - Opens the homepage (Lines 4 through 10)
- public function iGoToContactPage() - Navigates to the Contact Page (Lines 15 through 18)
- public function iFillContactInfoAndSubmitTheForm() - It is a method to fill in the form details and click the Submit button (Lines 23 through 27)
- public function iShouldBeAbleToSeeTheMessage() - It is a method that verifies the response message (Lines 32 through 35)
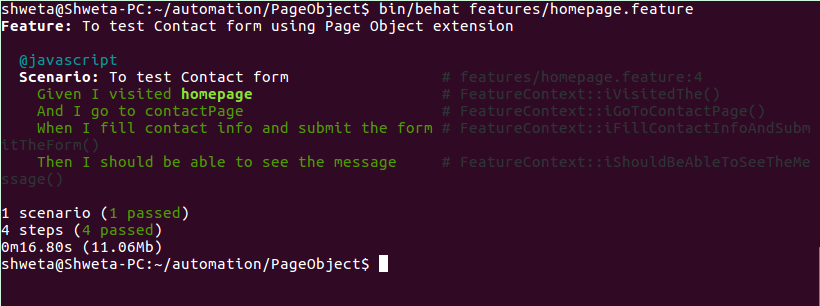
Let us run the feature file now. Fantastic, it has passed.
Note that the FeatureContext file here has become much more readable and cleaner.
- The open() method used above opens the path specified in the Class file. In this case, it is going to be the homepage.
- In the second function, the script first navigates to homepage and then clicks the Contact link.
- In the third function, the script navigates to the Contact Page, fills in the fields and submits the form.
- In the last function, script navigates to the ContactConfirmation page to assert the message
- Note that assertions should always be made in the feature files and the Feature Context file. Writing assertions in the Class file for the Page Object is not a good practice.
Advantages of using this method
- Both the feature file and the Context file are readable and cleaner, since all the dirty UI details are encapsulated in the Class file for that particular page.
- Maintenance becomes exponentially easy. Any changes made to the page, for example adding, modifying or deleting any field on the form needs changes to be made only to the particular class file without touching your test scenarios. The test scenario should be modified only if the test condition has changed.
- Functions are re-usable and can be used to test both positive and negative scenarios without having to write any extra code.
- BDD can be implemented rapidly since the scenarios are written in simple plain English language which is the gist of BDD.
Let me explain the maintainability characteristic quickly with the help of an illustration. Suppose, the Axelerant Marketing team decides to put in one form mandatory field on the form, say ‘Contact Number’ which has a name attribute = ‘contact’. The only place you would have to go and change is your ContactPage.php file by adding the line below:
$this->findField(contact)->setValue('9876234546');
Or for that matter, if the attribute for any of the existing fields changes on any of the pages, the only place where you would look for and change is the corresponding class file for that page. You would notice that the feature file and the FeatureContext file is untouched here.
NOTE: Creating the ‘ContactConfirmation.php’ was not necessary here since it just contained one assertion (not a good practice). The intention was just to show the level to which you can modularize your tests using this kind of framework. You can club the assertion step in the iFillContactInfoAndSubmitTheForm() method itself which is inside your FeatureContext.php file
More on Page Objects:
- You can span the custom functions across multiple Feature Context files if the application under test is huge. Logically related scenarios and pages should be grouped together in one Context file so that no single Class file becomes heavy.
- Further, you can also define all elements of a page in the Class file just once and use them with ease throughout the Class file. Click here for more details.
Give it a try and let us know how it goes!

Shweta Sharma, Director of Quality Engineering Services
When Shweta isn't at work, she's either on a family road trip across the country or she's dancing with her kids—it's a great combination.


Leave us a comment