
 We respect your privacy. Your information is safe.
Why Is Visual Regression Testing needed?
As the saying goes, necessity is the mother of invention. The need for catching user interface level bugs or CSS breaks resulted in the creation of visual regression testing tools. Catching CSS breaks gets tougher with every sprint or build since there are so many elements and components in a website that might get affected. In the era of continuous integration and agile, not only has catching bugs become more important, but also catching them as close as possible to the point of introduction. Having said that, the tool, Wraith, that will be introduced in this blog post is one that can be used by Frontend developers, testers and QA personnel to identify UI breaks in no time.
What Is Visual Regression Testing?
Visual regression testing is done to verify user interface components in a web page or application by taking screenshots of the page and comparing them with the desired page or layout. To carry this out, we should know the expected behavior, so that actual UI elements can be compared with the expected layout.
For example, if a change causes the font size of a “Learn More” button to change by a few pixels, it would be difficult for a tester to catch such a difference as the project progresses, since the theming looks intact even though it varies from the style guide. Visual regression tools would catch such bugs in no time and would also let the QA person know through the output format.
Introduction to Wraith Tool
Wraith is a very powerful screenshot comparison tool developed by the BBC News developers. It can take screenshots of your web page and compare them with another instance, test the page for responsiveness, compare pages on the same site over time, and also crawl your website and provide all the paths for testing. The best feature of this tool is that it is very easy to install, explore and implement. If as a QA person you are able to learn to use this tool and implement it in your projects, it will save you a lot of time in testing your websites.
Setting Up Wraith
Below are the steps to install Wraith on Windows:
- To begin with, we need to download and install a few pre-requisites:
- Ruby23 - x64
- ImageMagick - 7.0.5-4-Q16-x64-dll
- PhantomJS - 1.9.7 - Windows
- CasperJS - 1.1.4
- After you are done with downloading and installing the above, you are ready to install the gem. Run the command: gem install wraith
- After this command, run: wraith setup
This command will create folders in the directory you are in, like configs, javascript, etc. The configs folder, which has files ready for getting started with Wraith implementation straight away, is the focus here.
NOTE: Refer to http://bbc-news.github.io/wraith/os-install.html for installation steps as per the OS you have.
Using Wraith in Different Modes
Wraith operates in two main modes: ‘Capture’ mode and ‘History’ mode.
Capture Mode
Capture Mode works by comparing two sites against each other. The best example here is when we are comparing our test instance with the live site and want to highlight the differences.
Once you have installed Wraith and all its prerequisites, you will have to create and run a config file, which is basically a yaml file which contains all the configurations to be executed via the command line.
A basic config file for Capture mode looks like this:
|
# (required) The engine to run Wraith with. Examples: 'phantomjs', 'casperjs', 'slimerjs' browser: "phantomjs"
phantomjs_options: '--ignore-ssl-errors=true --ssl-protocol=tlsv1'
# (required) The domain to take screenshots of. domains: LIVE: "https://www.axelerant.com" Test: "https://test.axelerant.com"
# (required) The paths to capture. This particular config is using casperjs, so we can take screenshots of selectors rather than the entire page. paths: Home Page: path: /
# (optional) JavaScript file to execute before taking screenshot of every path. Default: nil before_capture: 'javascript/disable_javascript--phantom.js'
# (required) Screen widths (and optional height) to resize the browser to before taking the screenshot. screen_widths: - 1024 - 320
# (optional) Resize to each screen width (efficient), or reload at each screen width (costly). Default: 'reload' resize_or_reload: 'resize'
# (required) The directory that your screenshots will be stored in directory: 'shots_test1'
# (required) Amount of fuzz ImageMagick will use when comparing images. A higher fuzz makes the comparison less strict. fuzz: '10%'
# (optional) The maximum acceptable level of difference (in %) between two images before Wraith reports a failure. Default: 0 threshold: 5
# (optional) Specify the template (and generated thumbnail sizes) for the gallery output. gallery: template: 'slideshow_template' # Examples: 'basic_template' (default), 'slideshow_template' thumb_width: 200 thumb_height: 200
# (optional) Choose which results are displayed in the gallery, and in what order. Default: alphanumeric # Options: # alphanumeric - all paths (with or without a difference) are shown, sorted by path # diffs_first - all paths (with or without a difference) are shown, sorted by difference size (largest first) # diffs_only - only paths with a difference are shown, sorted by difference size (largest first) # Note: different screen widths are always grouped together. mode: diffs_first |
Executing the Config File in Capture Mode
After you are done with writing the config file, it should be saved with the .yaml extension and can be executed via:
wraith capture configs/filename.yaml
History Mode
History Mode compares the same instances of your website over time. The command wraith history is used to create base screenshots, and then the wraith latest command creates new screenshots, compares them with the base directory and spots discrepancies.
A basic config file for History mode looks like this:
|
# (required) The engine to run Wraith with. Examples: 'phantomjs', 'casperjs', 'slimerjs' browser: "phantomjs"
phantomjs_options: '--ignore-ssl-errors=true --ssl-protocol=tlsv1'
# (required) The domain to take screenshots of. domains: english: "https://www.axelerant.com"
# (required) The paths to capture. This particular config is using casperjs, so we can take screenshots of selectors rather than the entire page. #paths: #home: /
# (optional) JavaScript file to execute before taking screenshot of every path. Default: nil before_capture: 'javascript/wait--phantom.js'
# (required) Screen widths (and optional height) to resize the browser to before taking the screenshot. screen_widths: - 1440 x 2560 # Android Galaxy S7 - 1280 x 800 # Android Tablet - 1080 x 1920 # iPhone 6S Plus - 1536 x 2048 # iPad Air 2
# (optional) Resize to each screen width (efficient), or reload at each screen width (costly). Default: 'reload' resize_or_reload: 'resize'
# (required for history mode, otherwise optional) The directory that your base screenshots will be stored in. history_dir: 'axlshots_base'
# (required) The directory that your latest screenshots will be stored in directory: 'axl_shots'
# (required) Amount of fuzz ImageMagick will use when comparing images. A higher fuzz makes the comparison less strict. fuzz: '20%'
# (optional) The maximum acceptable level of difference (in %) between two images before Wraith reports a failure. Default: 0 threshold: 5
# (optional) Specify the template (and generated thumbnail sizes) for the gallery output. gallery: template: 'slideshow_template' # Examples: 'basic_template' (default), 'slideshow_template' thumb_width: 200 thumb_height: 200
# (optional) Choose which results are displayed in the gallery, and in what order. Default: alphanumeric # Options: # alphanumeric - all paths (with or without a difference) are shown, sorted by path # diffs_first - all paths (with or without a difference) are shown, sorted by difference size (largest first) # diffs_only - only paths with a difference are shown, sorted by difference size (largest first) # Note: different screen widths are always grouped together. mode: diffs_first
# (optional) Color to highlight the image diff. Default: 'blue' highlight_color: red
# (optional) Parameters to pass to Phantom/Casper command line. Default: '--ignore-ssl-errors=true --ssl-protocol=tlsv1' #phantomjs_options: '' |
Executing the Config File in History Mode
To execute it for the first time, run the command:
wraith history configs/filename.yaml
Run the command below to verify the same site at a later point of time and compare it with the screenshots that were taken in History mode earlier:
wraith latest configs/filename.yaml
Terminology Used in Wraith
Headless Browser
This is a browser which does not have a Graphical User Interface (GUI) and which runs in the backend via the command line interface. In Wraith, PhantomJS and CasperJS are used as headless browsers.
|
# (required) The engine to run Wraith with. Examples: 'phantomjs', 'casperjs', 'slimerjs' browser: "phantomjs" |
Domains
These are the URLs of sites which you want to compare. In Capture mode, there will be two of these, and in History mode, there will be one.
|
# (required) The domain to take screenshots of. domains: english: "https://www.axelerant.com" |
Paths
This is the parameter where we include the relative URLs of all pages which we want to compare.
|
# (required) The paths to capture. This particular config is using casperjs, so we can take screenshots of selectors rather than the entire page. paths: home: / |
Screen_widths
This parameter lists the different screen resolutions for which our browser will capture the screenshots.
|
# (required) Screen widths (and optional height) to resize the browser to before taking the screenshot. screen_widths: - 1440 x 2560 # Android Galaxy S7 - 1280 x 800 # Android Tablet - 1080 x 1920 # iPhone 6S Plus - 1536 x 2048 # iPad Air 2 |
resize_or_reload
This is an optional parameter for the config file. Through this parameter, we tell Wraith whether it should reload or resize the browser for every screen width you want to take a screenshot of. Resizing is more efficient and quick, while reloading is more costly in terms of resources.
Directory
This is the directory/folder where the screenshots get stored.
Fuzz
ImageMagick uses this property to measure the difference in color between two images. A higher fuzz means a less strict comparison. Normally, we maintain fuzz at 20%.
Threshold
Before reporting a failure, Wraith compares two images. The value upto which Wraith does not consider the difference between the two images as a failure is the Threshold Value. This value is entered as a percentage.
|
# (required) The directory that your latest screenshots will be stored in directory: 'shots'
# (required) Amount of fuzz ImageMagick will use when comparing images. A higher fuzz makes the comparison less strict. fuzz: '20%'
# (optional) The maximum acceptable level of difference (in %) between two images before Wraith reports a failure. Default: 0 threshold: 5 |
How Wraith Actually Works
Output generation is a two-step process. The first step involves a headless browser, such as PhantomJS and CasperJS, which captures the screenshots. The second involves ImageMagick, which compares the screenshots and creates a diff image, which is nothing but highlighting the differences between two images. Images are captured and compared on all resolutions as per what we provide in the config file. For example, in Capture mode, images are captured—one from the test instance and one from live—and then these are compared, giving a diff image.The third image shows changes in blue (this color can also be changed to red).
Another file, data.txt, is also created as output. This displays the changes in terms of pixels. Also, a gallery is created where we can see all the images and the diff images for each path listed in the ‘paths’ parameter. The gallery can be displayed as per the template you choose. There is a basic (default) template, which is just a list of thumbnails, one beside the other, and a slideshow template. Apart from selecting these, users can also specify the thumbnail sizes with the help of the parameter below in the config file:
|
# (optional) Specify the template (and generated thumbnail sizes) for the gallery output. gallery: template: 'slideshow_template' # Examples: 'basic_template' (default), 'slideshow_template' thumb_width: 200 thumb_height: 200 |
Using Selectors with Wraith
Until now, we’ve seen the Capture and History modes, which capture full-page screenshots of the paths mentioned in the config file. There may be cases when we don’t need to compare the entire page but need to check a specific component or block. For this purpose, we use “CasperJS and pass a selector” along with paths in the config file.
Let’s see how we can write the config file to specify the selectors. We’ve used the Axelerant site as an example here:
1. The first step here is to use the browser CasperJS.
2. We specify the CSS selectors in the paths file. The class name is used here starting with “.”
|
# (required) The engine to run Wraith with. Examples: 'phantomjs', 'casperjs', 'slimerjs' browser: "casperjs"
phantomjs_options: '--ignore-ssl-errors=true --ssl-protocol=tlsv1'
# (required) The domain to take screenshots of. domains: LIVE: "https://www.axelerant.com" Test: "https://test.axelerant.com"
# (required) The paths to capture. This particular config is using casperjs, so we can take screenshots of selectors rather than the entire page. paths: Home Page: path: / selector: '.span12.widget-span.widget-type-cell.full-width-bg.black-bg.balloons-night-bg' Why Axelerant Page: path: /why-axelerant selector: '.row-fluid-wrapper.row-depth-1.row-number-29' # (optional) JavaScript file to execute before taking screenshot of every path. Default: nil before_capture: 'javascript/wait--casper.js'
# (required) Screen widths (and optional height) to resize the browser to before taking the screenshot. screen_widths: - 1024
# (optional) Resize to each screen width (efficient), or reload at each screen width (costly). Default: 'reload' resize_or_reload: 'resize' |
3. Finally, run the config file to produce the gallery from the selectors. Use the command wraith capture configs/filename.yaml.
Hooks
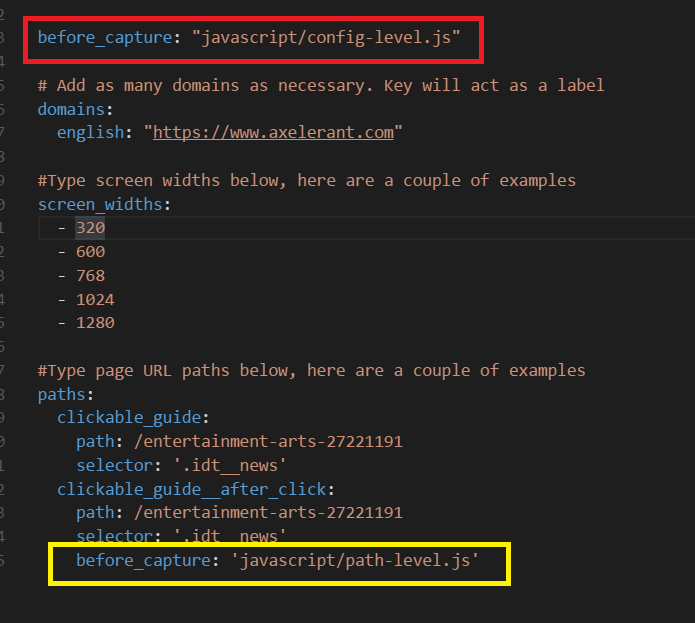
Wraith provides a before_capture hook to handle interactive content on the site, wherein the screenshot is captured by the tool after the hooks are executed. Hooks can be used in two ways: globally and at path level. In the screenshot below, the line marked in red is a global hook, whereas the line marked in yellow is a path level hook. Note:
- Global hooks are executed for the entire config file, whereas path level hooks are executed only for the path below which the before_capture hook is specified.
- Global hooks are always executed before path level hooks.
More about hooks can be learnt here.
Challenges Faced
There was a problem when the config files were failing for “https” URLs. The solution was to add a simple line to the config file:
phantomjs_options: '--ignore-ssl-errors=true --ssl-protocol=tlsv1'
The same property also works for CasperJS which is used during the section-wise comparison with the help of selectors. Unfortunately, the use of this property is not mentioned anywhere in the documentation.
Spider Mode
Spider mode crawls through your website and helps identify all the paths. So, instead of manually specifying the paths using the “paths” property, you just need to run this mode. This saves a lot of time, since all the paths are identified and ready to be used in a file. The way to use this method is as below:
- Create a replica of a previous config file “capture_mode.yaml” and save it as “spider_mode.yaml”
- Delete the “paths” property from your config file “spider_mode.yaml”
- Add the line - imports: "spider_paths.yml" or any logical filename to “spider_mode.yaml”
- Run the command wraith spider filename.yml
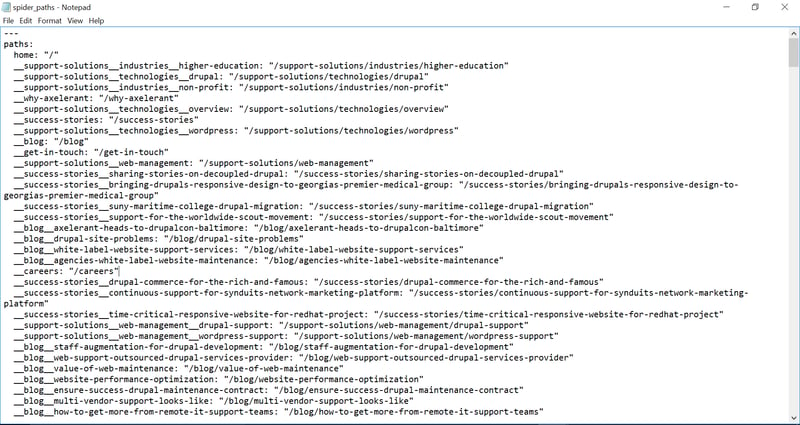
After running the command, open “spider_paths.yaml” and you would see that all the paths are listed from the site specified in the domain. Now, the “spider_mode.yaml” file can be used with Capture and History mode as described previously.
Below is the screenshot of the “spider_paths.yaml” that was run against “https://www.axelerant.com/”
Advantages
Let’s look at the advantages first:
- Extremely easy and quick to set up/install on all operating systems.
- You can get started with automated visual regression testing immediately by just modifying pre-existing config files, without having to write a single line of code.
- Supports responsive testing.
- Output easy to read, which in turn helps in finding bugs quickly.
Disadvantages
- Not very good when it comes to handling dynamic content.
- Doesn’t support cross-browser testing.
Best Practices
While automation does add value most of the time, the value provided needs to be optimized by following some best practices:
- Don’t try to test all the visuals: As with all other automation tools, the statement “Automation cannot entirely replace manual work” holds true in this case as well. Target areas/components which are reused and more fragile.
- Full page screenshots are not recommended: If you try to capture everything in a single screenshot, you might end up with false results. Component level screenshots are preferable to full-length screenshots for a couple of reasons. Firstly, you can run the test for only the changed components, making your results more specific and of interest. Secondly, it would also save a lot your time—full-page screenshots take much longer, and sometimes you might end up with timeout errors.
Other Visual Regression Tools
There are similar tools like PhantomCSS, Gemini, Shoov and WebdriverCSS available for free which provide even better features, as discussed below:
- PhantomCSS handles dynamic content in a better fashion because it is built over CasperJS, which comes with a rich set of library functions to handle events. For more information, click here.
- Gemini goes one step ahead and provides features like running tests on various browsers. It is also preferable in a continuous integration environment. For more information, click here.

Shweta Sharma, Director of Quality Engineering Services
When Shweta isn't at work, she's either on a family road trip across the country or she's dancing with her kids—it's a great combination.


Leave us a comment